Lifting Weights — The Start
I have been an athlete my whole life. I played sports all three trimesters throughout most of middle school and high school. I also regularly did mid-distance running and carried on this training through college (and still do to this day). However, I had never done any serious weightlifting prior to college. Like most I was a bit intimidated by the weight room – the smash of weights hitting the ground and the grunts of exhaustion from trying to squeak out that last rep was all a bit much. Perhaps more significantly, I wouldn’t have even known where to begin had I worked up the courage to go into the weight room.
I finally made it into the weight room my junior year of college with a group of friends that helped show me the basics. They taught me the four barbell lifts that serve as the foundation for all strength training and weightlifting. Specifically, they were: squats, bench press, deadlifts, and overhead press.

I spent the next two years working on and improving these "core lifts". As I got better I was able to lift more and more weight. After a while though, my progress plateaued and I stopped improving. I had finally reached the point where in order to get better I had to do more than just "show up and workout". I needed to improve my lifting form and mechanics – raw muscle and elbow grease wasn’t going to do the trick anymore.
It quickly became apparent that it would be difficult to improve my lifting form and mechanics without some kind of coach. However, this wasn’t feasible as a poor college student (and I had already spent my P.E. credits on Boxing). What I really wanted was an assistant that would provide useful tips and pointers throughout my workout. I needed something like "Clippy" from Microsoft Word. (For those that don’t know, Clippy was a virtual assistant that made suggestions in older versions of Microsoft Word).

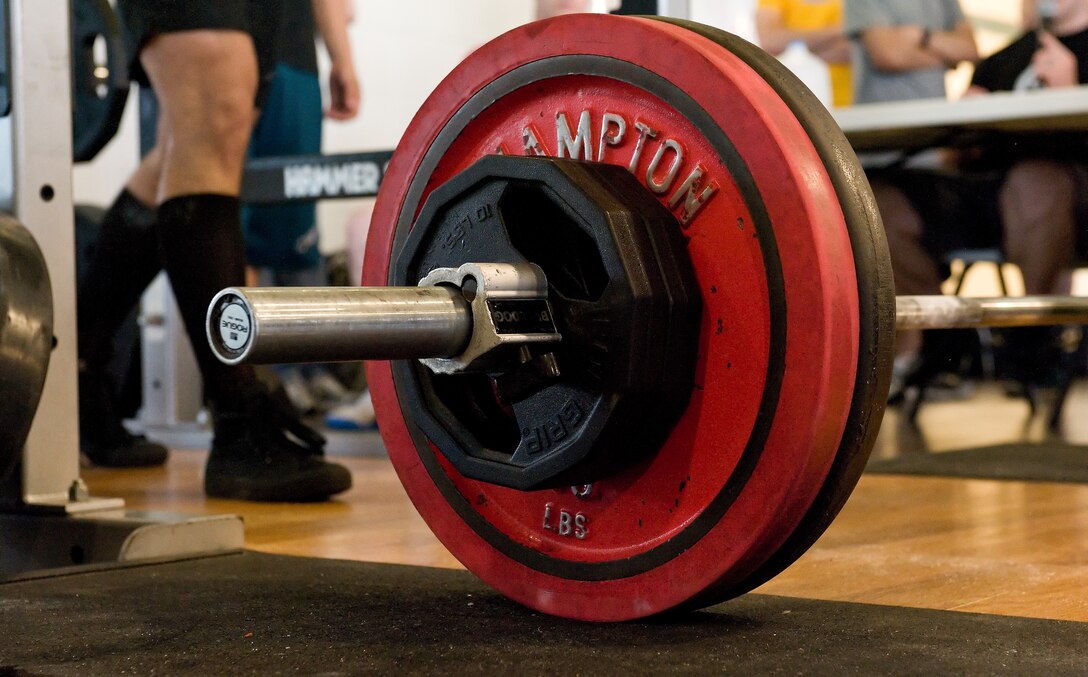
As I discussed this idea with some friends, a fitting idea emerged. Barbells use clips at their ends to hold the weight onto the bar so it doesn’t fall off while in motion. I could build a "smart clip" that records data during a lift and then makes recommendations afterwards. I could quite literally have my own "Clippy" that would clip onto my barbell and help me lift. I ended up using the name "Lift Buddy" instead to avoid copyright issues though.
Rapid Prototyping — Using Arduino
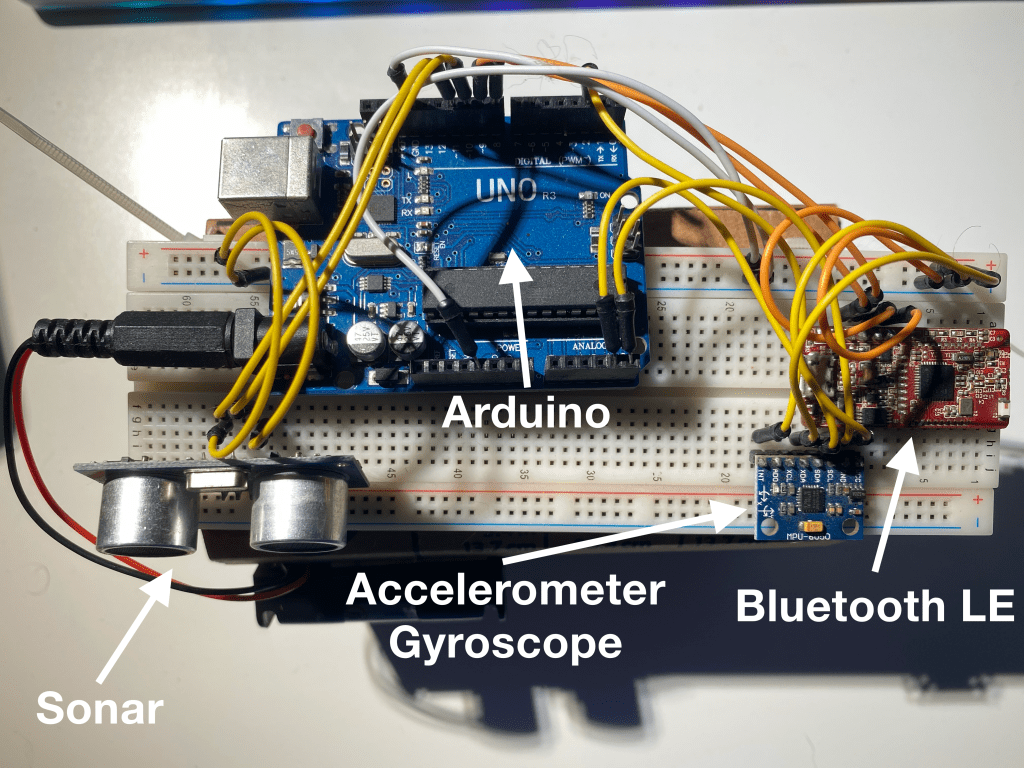
Prototyping electronic hardware (such as a smart barbell clip) has been historically expensive and cumbersome. However, recent developments such as cheap printed circuit boards and 3D printing have made the process much more accessible. One popular tool is Arduino. Arduino is an open-source platform for development on small microcontrollers that can interface with various sensors and tools.

One can prototype a wide variety of different things by combining various sensors and tools together. For example, a startup I worked with at Cornell used Arduino to prototype smart-phone powered laser tag (Splat). Here I planned on using an Arduino board combined with various sensors to analyze the motion of the barbell as the "smart clip" moved with it. My first task was to pick out all of the sensors I would need to analyze a lift.
Accelerometers and Gyroscopes — Picking the Right Tools
One common mistake when lifting a barbell is tilting it unevenly in any direction. For example, when lifting a barbell up one needs to ensure both sides of the barbell stay level. That is, one side shouldn’t come up before the other. Any tilt can result in an uneven distribution of force, which can cause injury or cause the barbell to fall. As such, it’s very important to track any changes in the rotation of the bar. There are three types of angular rotation that can affect the bar: roll, pitch, and yaw. They can be thought of as follows:
- Roll: Tilting the bar due to leaning to the right or left side
- Pitch: Tiling the bar due to learning forwards or backwards
- Yaw: Moving the bar due to turning left or right or "spinning" around

I was able to use a dual accelerometer and gyroscope sensor known as the MPU6050. It allowed me to measure pitch and roll. (Measuring the yaw accurately requires an additional component due to the fact that the yaw axis is parallel with gravity making it hard to detect change in acceleration). I could now detect shifts in the position of the bar during the course of the lift. Using that information I could then make recommendations after the lift was complete.
The next type of recommendation that I wanted to be able to make was regarding the motion of the barbell. I wanted to measure the distance it moved, how fast it moved, and how quickly it accelerated. Naturally, I had thought my problem was already solved. The MPU6050 is an accelerometer and gyroscope. I thought I could use the accelerometer to measure how quickly the bar accelerated and then infer the velocity and distance from that. While I was right that it could be used to measure acceleration, the story was more complicated for velocity and distance.
One computes velocity and distance from acceleration using integration, a technique from calculus. Unfortunately, numerical integration has a certain degree of error and each time you integrate the error gets worse. Specifically, the error grows linearly for computing velocity and quadratically for computing distance (with respect to time). This meant that if my accelerometer was just 0.1 units off, then after 10 seconds my error in computing distance would be off by a factor of 100. Empirical testing confirmed this. I was unable to measure velocity or distance accurately using the accelerometer. This is the same reason many early fitness devices did such a poor job of measuring the distance you walk. They could only afford to include an accelerometer in them, which is too inaccurate to track distance over time. (They can somewhat accurately detect steps though by detecting your body accelerating each time you swing your leg). Most modern fitness devices use a combination of GPS and accelerometers to accurately track your speed and distance. This left me in a bit of a bind. How was I going to build a cheap prototype that could also measure distance and velocity? The struggles of past fitness device makers didn’t give me much hope. Luckily, I happen to find a sensor that fit my use case perfectly.
Sonar — Improving the Tools
Sonar sensors work by sending out an ultrasonic sound wave and then waiting for it to bounce back. By measuring how long it took the wave to bounce back, one can measure distance from the sonar sensor to another object. Therefore, I could use a sonar sensor aimed downwards on the barbell clip to measure the distance between the ground and the barbell. This gave me a way to measure the distance traveled by the barbell while lifting. It also gave me a good way to measure velocity. I could use calculus (specifically differentiation) to infer the velocity from the distance traveled over time. I could also measure acceleration this way if I wanted to (although I already had the accelerometer to give me acceleration readings). It turns out that any error in taking the derivative of something is significantly less than the error in integrating something. (One way to think of why this is true is because differentiation is a local operation and integration is a global one, so differentiation requires less information to compute it it accurately). Thus, I could use sonar to compute the position and velocity of the bar.
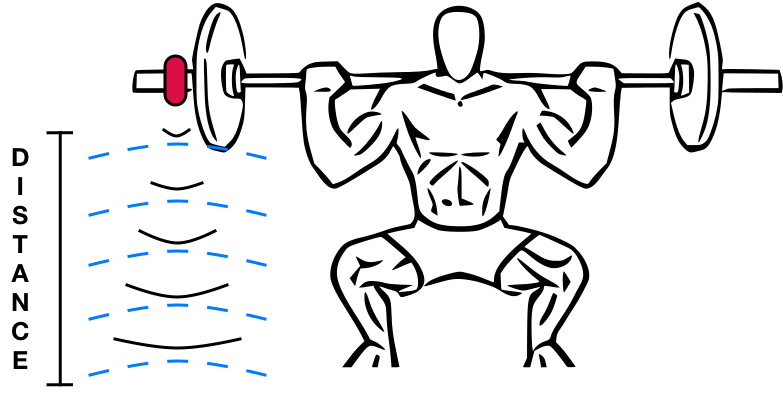
Most sonar sensors are extremely expensive and large because they need to work across long distances. Luckily, I only needed my device to work up to a maximum distance of 10 feet (the maximum distance the barbell would be raised over one’s head). I found an Arduino-compatible sonar sensor that worked up to about 10 feet called the HC-SR04. I was now able to detect the distance the bar traveled during the lift and its velocity. This enabled me to create detailed graphs showing things such as the explosiveness of a lift or at what points in a lift one struggles. However, to create those graphs or display anything of value to the user I needed a way to get the data from the "smart clip" onto a smartphone.
Bluetooth LE — Hooking It All Up
Originally I wanted my device to work on both iOS and Android. Android wasn’t much of an issue as there weren’t many restrictions on how a device could communicate with Android. iOS, however, was a different story. Apple restricts the ability for a developer to make and distribute an app that communicates with an electronic device in many cases. Developers need to join Apple’s MFi Program and joining isn’t a simple process. Luckily, in early 2010 Bluetooth Low Energy technology was developed. Bluetooth Low Energy (BLE) is a technology that makes it easy and energy-efficient to transmit data from one device to another over a short distance. This new technology was deemed effective enough by Apple to allow any developer to use it in their apps without meeting any formal requirements. By 2012 most iOS and Android devices had support for interfacing with BLE devices. In subsequent years prices for BLE chips became increasingly affordable and eventually a cheap version was released for Arduino. This was just in time for me to use the RedBearLab BLEMini for less than $20 (which has since been discontinued). They also provided code to facilitate communication between iOS and Android. I had now completed the Arduino prototype device and was ready to start building the corresponding iOS and Android client apps.

Immersive Lifting — The Original iOS Client
I first wanted to build an iOS app because most of the devices I used were part of the Apple ecosystem. Unfortunately, I had just about no experience in iOS development (I did have experience in Android development though). Nonetheless, I plowed ahead and learned the basics of iOS until I was able to build a simple prototype app.
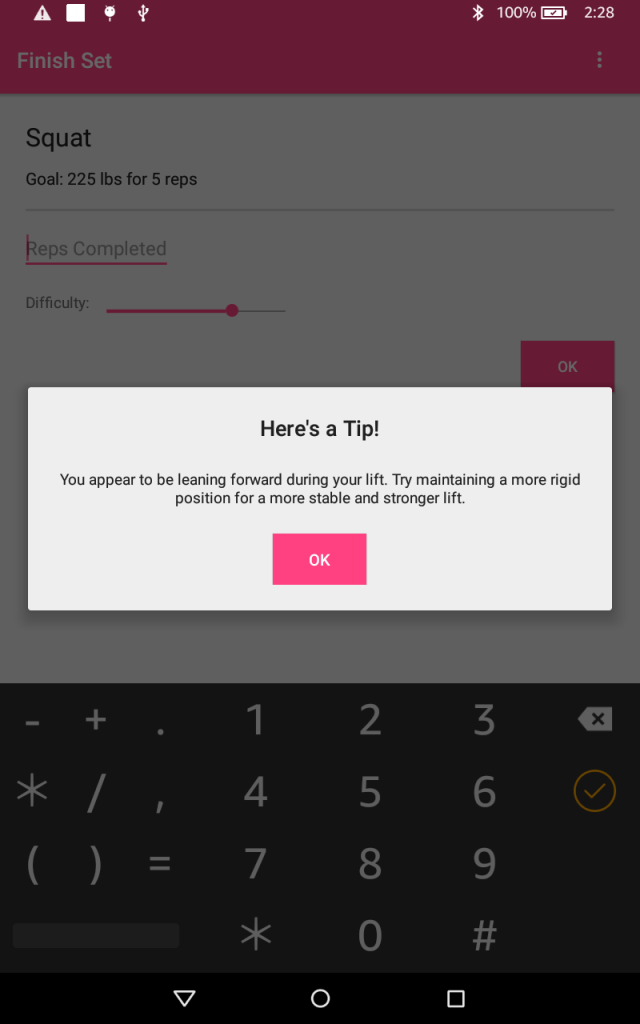
I designed the app to be an immersive app rather than a "tracking" or "checklist" app. Most lifting apps have you create a workout template prior to a workout. These templates include details such as name, weight, sets, and reps. You then mark each lift as completed as you work out. Alternatively, many apps or users would simply fill out the template after completing their entire workout. This made sense because filling out that template didn’t actually help you lift. For this reason most lifting apps served as "trackers" or "checklists". My app was different though because it provided useful data and advice for each lift. This meant that a user would need to use the app as they lifted in order to get the most of out it. This required me to make some fundamental changes to the design of the standard lifting app.
I designed the app to be used during lifting. So while templates can be created and used, the logging of each lift needs to be done while the lift is being executed. The process works as follows for an individual lift:
- Select the lift you’re executing from a template or manually enter the name, weight, and goal number of reps.
- Click "start lifting" and do the lift. A "lift in progress" message is shown while the lift is being executed and Lift Buddy collects data from the smart clip.
- Click "complete lift" once finished. Stats from the lift are then shown to the user, along with recommendations.
- Begin the next lift.
This design forced the user to immerse themselves in the lift and not just treat the app as a "tracker" or "checklist".
With that design in mind, I worked through the fundamentals of iOS development and created a very rough and simple prototype app. The initial iOS app was completed around 2014 and worked in only the most basic ways. Specifically, a user could pair with the smart clip and use the app to execute and save lifts. The app displayed basic stats for each lift along with position, velocity, acceleration, pitch, and roll data. The data was often noisy and it took a few reps to get an accurate reading. Further, I had yet to implement any suggestions based on that data. I was able to dig up an old screen-recording of the app being demoed below.
Trying Again — The Android Client
After developing the initial iOS app I took a break from the project because I was finishing up my last semester at Cornell and starting a job at Amazon soon (Goodreads specifically). By time I came back to the project about a year later I was a much more experienced Android developer thanks to a final course at Cornell and my work at Amazon. This inspired me to build a more robust Android app. I planned on re-using the same "immersive design", but doing a much better job on the data processing and analysis. I also wanted to embrace a flatter and simpler design as most apps had started to move away from skeuomorphic design principles.
Initially I focused on basic Android programming. I was simply creating better-looking Android version of what I had on iOS. Most of the additional work came in the form of improving data processing and analysis. My first step was reducing "noise" from the data sent from the device. The device works by constantly streaming data over bluetooth to the smart phone. Specifically, the following lines of data are continuously sent over:
s:123a:456:789
The s corresponds to "sonar" and the number next to it represents the distance from the barbell to the ground. The a corresponds to "accelerometer/gyroscope" and the numbers next to it represent the pitch and roll, respectively, as degrees (°).
Occasionally the sensor would return a non-sensical value due to a sensor error or some other random event. For example, a stream of sonar data might return: [10, 12, 10, 11, 15, 20, 325, 24, 26, 27, 24, 14, 10, 10, 10] This resulted in spiky graphs that were hard to read (in the example above the spike would be at value 325). I was able to remove such spikes by simply filtering out values that deviated significantly from the average value. Unfortunately though, this wasn’t enough. Occasionally the data would contain spiky "regions" rather than single values. I tried to eliminate those using the same technique – but it was a constant game of cat and mouse. Each time I fixed a type of spike or anomaly, some other would be uncovered or appear. To solve the issue more holistically I implemented a moving average on top of my other improvements. A moving average works as a smoothing function. It smooths a stream of spiky data by recording continuous averages of the data returned from the sensor instead of the sensor values themselves. This can be clearly seen below by comparing results from the app with and without the smoothing function.

In the example above the user is executing a series of overhead presses. The upward-facing peaks represent the bar traveling upwards until it slows down to 0 when the bar is fully lifted up. The downward-facing peaks represent the bar traveling back down until the user is ready for their next rep. In the graph with smoothing one can easily see each upward press followed by bringing the bar back down. In the graph without smoothing it’s not totally clear what is happening.
I was able to use this collection of smoothed data to make detailed recommendations based on certain characters of the graph, such as slope and shape. Specifically, for each type of data I made the following recommendations:
- Position Data: Range of motion
- Velocity Data: Weak points in a lift
- Acceleration Data: Explosiveness to start/finish a lift
- Pitch/Roll Data: Stability and form during a lift
Where We Are and Where We’re Going
I had finally completed my prototype of "Lift Buddy" and was ready to move on to learning new things with a new project. Taking "Lift Buddy" beyond the prototype stage would have required a very large amount of effort and funding. Plus I had already gained many of the benefits that a real "Lift Buddy" device would have provided simply by making the prototype. All of the research I did into lifting mechanics and measurement helped me significantly with my own lifting form. So even though I didn’t quite have a finished product that I could use everyday – I still ended up benefiting as if I had. In the future I hope to further explore how technology can be used to improve health. I’ve included a live demo below.

One reply on “Lift Buddy – Making A Smart Barbell Clip”
[…] limitations such as my health. (I had already hacked my physical health in previous projects here and here). It seemed my limiting factor was mental health. In order to investigate further I read […]
LikeLike